Introduction
The smell of bubbling cheese and crispy dough always brings me back to my childhood kitchen, but toss in a dash of Halloween creativity and suddenly it’s a party. Mini Halloween pizzas are my go-to snack when October rolls around—honestly, nothing gets kids (and adults) more excited than food that looks a little spooky and a lot delicious. I first whipped up these easy mini Halloween pizzas for a neighborhood trick-or-treat night when I needed something fast, festive, and guaranteed to vanish from the snack board. Let’s face it, you can’t go wrong with pizza, especially when it’s bite-sized and decked out as ghosts, mummies, or even jack-o’-lanterns!
This recipe for easy mini Halloween pizzas is all about simplicity and playful decorating. Whether you’re busy juggling costumes and candy or just want a low-effort way to add some fun to your Halloween spread, these little pizzas fit right in. I’ve made them with my kids, my friends, and honestly—even solo when I wanted a cozy night in with a scary movie and a snack that made me smile. The best part? You don’t need fancy ingredients or hours in the kitchen. You’ll get melty cheese, tangy sauce, and a crispy base, all in a package that’s totally Instagram- and Pinterest-worthy.
As a food blogger who’s tested this recipe at more than a dozen parties (and with a few picky eaters too), I can promise these mini Halloween pizzas are reliable crowd-pleasers. They’re fun to make, easy to customize, and, because you’re making them mini, perfect for snack boards and sharing. If you want easy, creative, and delicious, this is the Halloween recipe for you—whether you’re a pizza pro or just getting started.
Why You’ll Love This Recipe
- Quick & Easy: Ready in under 35 minutes—ideal for last-minute Halloween plans or when you need a snack in a hurry.
- Simple Ingredients: Uses pantry staples like pizza sauce, cheese, and English muffins. No trips to specialty stores required!
- Perfect for Parties: These mini Halloween pizzas shine on spooky snack boards, at kids’ parties, or for cozy movie nights.
- Crowd-Pleaser: Kids adore decorating their own, and adults love snacking on them between “Boo!”s.
- Unbelievably Delicious: Crispy edges, gooey cheese, and the classic pizza flavors you crave—with a Halloween twist.
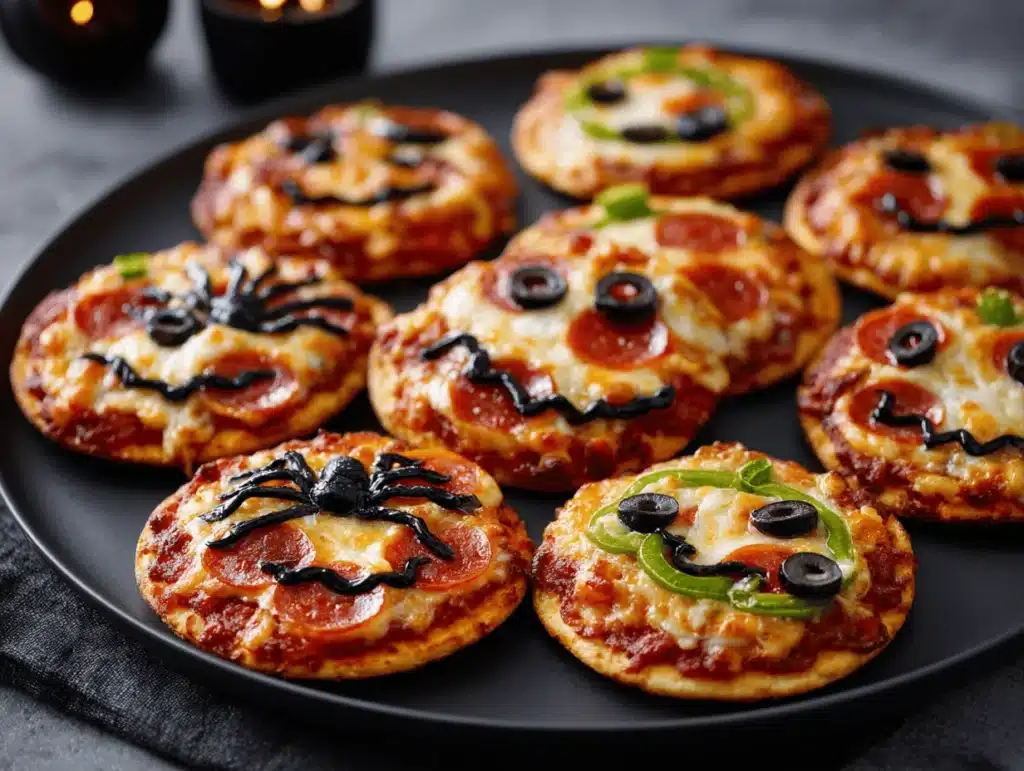
What really sets this easy mini Halloween pizzas recipe apart is the decorating. You get to play with olives for eyeballs, strips of cheese as mummy wrappings, and pepperoni cut into jack-o’-lantern faces. I always blend my pizza sauce with a pinch of garlic powder for extra flavor—trust me, it makes a difference. Plus, you can use naan, bagels, or even tortillas as your base if you want to mix things up.
This recipe is a comfort food classic dressed up for the season. It’s the kind of thing that makes you smile before the first bite, and then you close your eyes and just enjoy the cheesy goodness. No stress, just fun and flavor. If you want a Halloween snack that’s easy to throw together, looks fantastic on Pinterest, and tastes even better, these mini pizzas are your ticket to snack board fame.
Ingredients Needed
This recipe uses simple, wholesome ingredients to deliver bold flavor and a satisfying texture without any fuss. Most of what you need is probably already in your pantry or fridge, and there’s plenty of room for swaps and creativity.
- For the mini pizza bases:
- 6 English muffins, split (or use mini naan, bagels, or tortillas for variety)
- 1 tablespoon olive oil (for brushing, helps crisp the base)
- For the sauce:
- 1 cup pizza sauce (homemade or store-bought—try Rao’s or Muir Glen for rich flavor)
- 1/2 teaspoon garlic powder (optional, adds depth)
- For the toppings:
- 1 1/2 cups shredded mozzarella cheese (part-skim or whole milk—both work well)
- 1/2 cup sliced black olives (for eyes or spooky details)
- 18 slices pepperoni (or turkey pepperoni—easy to cut into jack-o’-lantern faces!)
- 1/4 cup sliced green bell pepper (for stems or monster mouths)
- 1/4 cup sliced mushrooms (optional, for texture or ghost shapes)
- 2 slices provolone cheese (for ghost shapes—cut with a cookie cutter or knife)
- 1/2 cup string cheese (pulled into strips for mummy wrappings)
- Optional extras:
- Red onion slices (for creepy “veins” or monster hair)
- Pineapple tidbits (for a sweet-and-savory twist—my kids love this!)
- Fresh basil leaves (for garnish and a pop of color)
- Substitutions:
- Use gluten-free English muffins or tortillas for a gluten-free option.
- Swap dairy cheese with vegan mozzarella for dairy-free mini pizzas.
- Try almond flour flatbreads for a low-carb base.
Honestly, the ingredients are flexible. Sometimes I use leftover roasted veggies or swap the sauce for pesto if I’m feeling adventurous. The key is to have fun and keep it stress-free!
Equipment Needed
- Baking sheet: Standard rimmed sheet works best; line with parchment for easy clean-up.
- Wire rack: Optional, but placing pizzas on a rack after baking keeps the bottoms crisp.
- Sharp knife and kitchen scissors: For cutting pepperoni faces and ghost cheese shapes—scissors make it faster!
- Pastry brush: For brushing olive oil on the bases. If you don’t have one, use the back of a spoon.
- Cookie cutters: Ghost or pumpkin shapes for cheese slices, but a knife works if you’re patient.
- Mixing bowl: To stir sauce and garlic powder together.
I’ve used everything from pizza stones to old-school metal pans. If you’re using a toaster oven instead of a big oven, reduce the bake time slightly and keep an eye on browning. For budget-friendly options, dollar store baking sheets work fine—just line them well. And don’t forget to check your kitchen gadgets for fun shapes; I once used a tiny heart cutter for bat wings!
Preparation Method
- Preheat the oven: Set your oven to 400°F (200°C). If you’re using a convection oven, you can drop the temp to 375°F (190°C). This helps the cheese melt evenly and gives a crisp base.
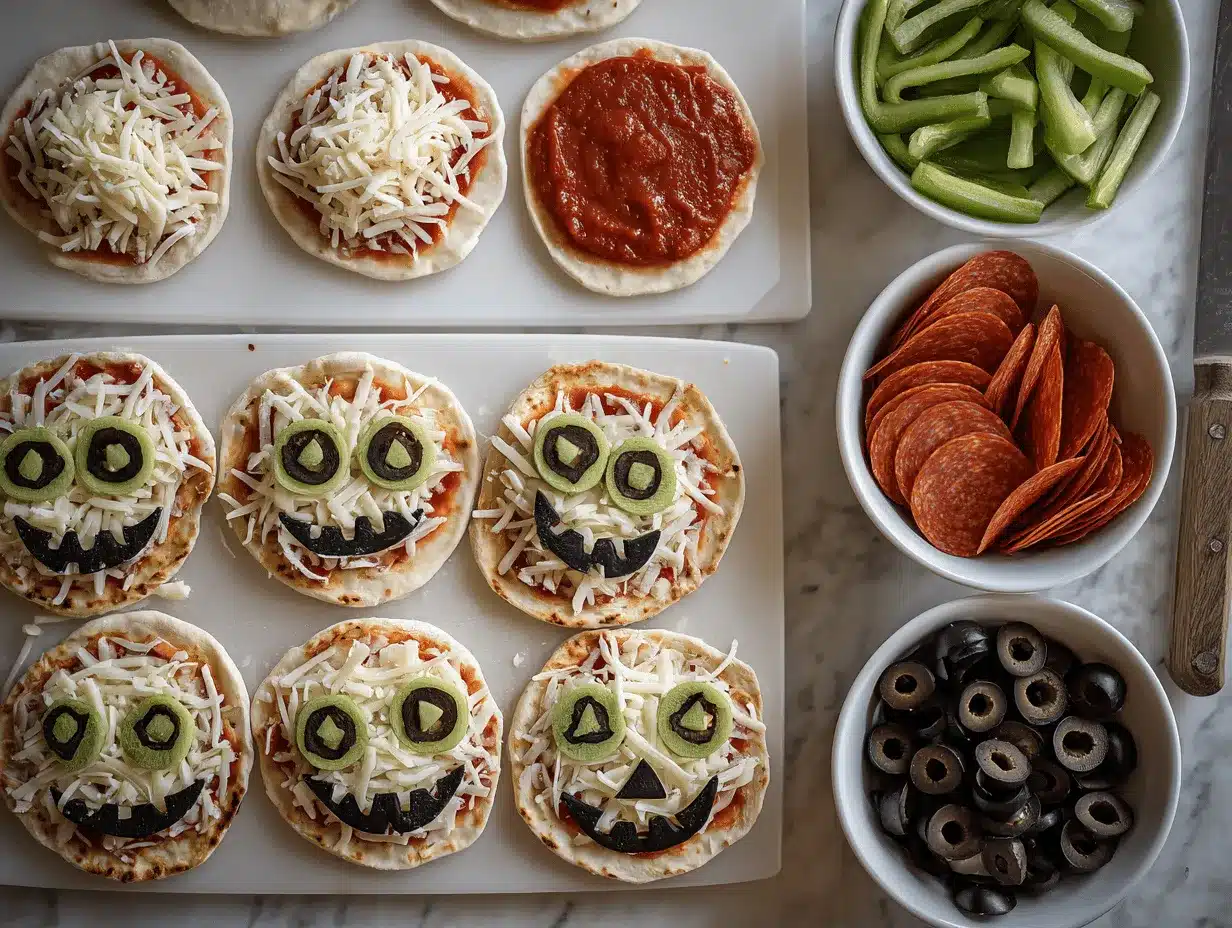
- Prepare the bases: Split the English muffins and arrange them cut-side up on a lined baking sheet. Brush lightly with olive oil (about 1 tablespoon total). This step keeps them from getting soggy and adds a golden crunch. If using naan or tortillas, lay them flat and brush as well.
- Mix the sauce: In a small bowl, stir together 1 cup pizza sauce and 1/2 teaspoon garlic powder. Taste and adjust seasoning if you like more zing. Spread about a tablespoon of sauce onto each muffin half, leaving a small border for the “crust.”
- Add the cheese: Sprinkle each mini pizza with a generous layer of shredded mozzarella (about 2 tablespoons per pizza). If making mummies, lay strips of string cheese across the top in a crisscross pattern. For ghosts, place a slice of provolone cut into a ghost shape right in the center.
- Decorate: Here’s where you get creative! Use sliced olives for eyes, pepperoni cut into jack-o’-lantern faces, and bell pepper pieces for stems or mouths. Mushrooms make great monster ears or ghostly wisps. If you’re making a snack board for a crowd, prep a variety of designs so everyone can pick their favorite.
- Bake: Slide the baking sheet into the oven and bake for 10-12 minutes (English muffins) or 8-10 minutes (thin tortillas), until the cheese is bubbling and starting to brown. If using a wire rack, transfer pizzas immediately after baking to keep the bottoms crispy. Watch closely—sometimes cheese ghosts melt fast!
- Cool and serve: Let mini pizzas cool for 2-3 minutes. This helps the cheese set and makes them easier to handle, especially for little hands.
Troubleshooting tips: If your cheese slides off, try patting toppings dry before adding. Muffin bases can get soggy if over-sauced, so stick to about 1 tablespoon per mini pizza. If your decorations melt too quickly, bake pizzas halfway, then add special shapes and finish baking for 3-4 more minutes.
Personal tips: I always prep all toppings in advance and set them out in little bowls for easy decorating. Sometimes I let kids assemble their own—it gets messy but it’s way more fun!
Cooking Tips & Techniques
I’ve made these easy mini Halloween pizzas more times than I can count, and here’s what I’ve learned along the way.
- Keep it dry: Wet toppings (like fresh veggies) can make mini pizzas soggy. Pat them dry with a paper towel before adding.
- Even cheese coverage: Don’t pile cheese too high. A thin layer melts evenly and keeps toppings visible—important for those spooky designs!
- Timing matters: If you’re making a big batch for a snack board, bake in two rounds and rotate the tray halfway through for even browning.
- Decorating strategy: Place special shapes (ghosts, faces) halfway through baking to prevent melting into blobs. I’ve lost a few ghost faces to over-baking…
- Multitasking: Assemble pizzas while the oven preheats. If you’re prepping with kids, set up a topping “decorating station”—it keeps things organized and fun.
- Consistency: Use similar-sized bases so everything cooks evenly. If you mix muffin halves with tortillas, stagger the bake times.
- Personal lesson learned: One time I used too much sauce, and every pizza ended up soggy. Less is more when it comes to sauce, trust me!
For extra crisp, broil the pizzas for 1-2 minutes at the end—just watch them closely. And if you’re short on time, use pre-shredded cheese and store-bought sauce; it’s totally fine and still tastes awesome!
Variations & Adaptations
- Gluten-Free: Use gluten-free English muffins or tortillas. I’ve made these for friends with gluten sensitivities using Udi’s brand, and nobody could tell the difference.
- Dairy-Free: Swap mozzarella for vegan cheese shreds (Daiya or Violife work well). Use plant-based pepperoni if needed.
- Seasonal Veggie Twist: In autumn, use roasted butternut squash or sweet potato slices for pumpkin faces. In summer, swap mushrooms for fresh cherry tomato halves.
- Low-Carb Option: Try mini cauliflower crusts or almond flour tortillas. The texture is different but still tasty—and fits keto diets.
- Flavor Boost: Add a sprinkle of Italian seasoning or red pepper flakes before baking. My family loves a hint of heat!
- Personal favorite: I once made a “Frankenstein” pizza with pesto, green peppers, and olive eyes. It’s a hit every year on our snack board!
If you want to make these in an air fryer, reduce the bake time to 6-8 minutes and check for browning. You can also grill them on a panini press for a crispy bottom—just watch the cheese doesn’t ooze out!
Serving & Storage Suggestions
Serve these mini Halloween pizzas warm for maximum gooeyness—the cheese stretches, the sauce is tangy, and the crust is crisp. I like to arrange them on a big wooden board with fake spiders and a few bowls of popcorn or veggies. They look fantastic with a side of ranch or marinara for dipping.
Pair your snack board with sparkling apple cider or orange punch for a festive vibe. If you’re serving adults, red wine or pumpkin beer packs a seasonal punch.
To store leftovers, let pizzas cool completely, then layer between sheets of parchment in an airtight container. Refrigerate for up to 3 days. For longer storage, freeze in a single layer until solid, then transfer to a freezer bag—lasts 1-2 months.
Reheat in the oven at 375°F (190°C) for 5-7 minutes, or in the air fryer for 3-4 minutes. I don’t recommend microwaving (it makes them chewy), but if you’re in a rush, 30 seconds per pizza does the trick. The flavors actually deepen overnight—so don’t be surprised if they taste even better the next day!
Nutritional Information & Benefits
Each mini Halloween pizza (using English muffin base) is about 120-150 calories, depending on toppings. You’ll get roughly 6g protein, 3g fat, and 16g carbs per pizza. Using whole wheat muffins boosts fiber and micronutrients.
Cheese provides calcium and protein, while tomato sauce brings vitamin C and lycopene. If you add veggies (peppers, mushrooms), you’re sneaking in antioxidants and fiber. For those with allergies, use gluten-free bases and check cheese labels for dairy-free options.
I love that these are easy to adapt for low-carb or dairy-free diets—plus, they’re portion-controlled for snacking. Personally, I feel good serving these to my family since they’re baked, not fried, and you can load them up with veggies!
Conclusion
Mini Halloween pizzas aren’t just cute—they’re the ultimate combo of fun, flavor, and convenience. Whether you’re making a spooky snack board for a party or just treating yourself on a cozy October night, this recipe brings all the joy of pizza in a playful, bite-sized package.
Try swapping toppings, experimenting with different bases, or letting your family design their own edible monsters. That’s what I love most—everyone gets involved and the results are always memorable (sometimes hilariously imperfect, but that’s part of the magic!).
If you make these easy mini Halloween pizzas, let me know in the comments how you decorated yours. Share your photos, tag me on Pinterest, or suggest your favorite spooky topping. Happy haunting—and happy snacking!
FAQs
Can I make these mini Halloween pizzas ahead of time?
Yes! Assemble and bake the pizzas, then cool and refrigerate. Reheat in the oven before serving for the best texture.
What’s the best base for mini pizzas?
English muffins, mini naans, bagels, and tortillas all work well. Choose based on your preference or dietary needs.
How can I keep the decorations from melting too much?
Add detailed toppings (like ghost shapes or faces) halfway through baking, or even right at the end for a defined look.
Are these mini Halloween pizzas kid-friendly?
Absolutely! Kids love decorating their own pizzas. Just supervise with sharp tools and hot ovens.
Can I freeze leftover mini pizzas?
Yes. Cool completely, freeze in a single layer, then store in a freezer bag for up to 2 months. Reheat in the oven for best results.
Pin This Recipe!


Easy Mini Halloween Pizzas Recipe for a Spooky Snack Board
- Total Time: 32 minutes
- Yield: 12 mini pizzas 1x
Description
These easy mini Halloween pizzas are a fun, festive, and delicious snack perfect for parties or cozy nights in. Bite-sized and customizable, they’re decorated as ghosts, mummies, and jack-o’-lanterns for a spooky seasonal treat.
Ingredients
- 6 English muffins, split (or use mini naan, bagels, or tortillas)
- 1 tablespoon olive oil (for brushing)
- 1 cup pizza sauce (homemade or store-bought)
- 1/2 teaspoon garlic powder (optional)
- 1 1/2 cups shredded mozzarella cheese
- 1/2 cup sliced black olives
- 18 slices pepperoni (or turkey pepperoni)
- 1/4 cup sliced green bell pepper
- 1/4 cup sliced mushrooms (optional)
- 2 slices provolone cheese
- 1/2 cup string cheese (pulled into strips)
- Red onion slices (optional)
- Pineapple tidbits (optional)
- Fresh basil leaves (optional)
- Salt and pepper to taste
Instructions
- Preheat oven to 400°F (200°C). For convection ovens, set to 375°F (190°C).
- Split English muffins and arrange cut-side up on a lined baking sheet. Brush lightly with olive oil.
- In a small bowl, mix pizza sauce and garlic powder. Spread about 1 tablespoon of sauce onto each muffin half, leaving a border for the crust.
- Sprinkle each mini pizza with shredded mozzarella. For mummies, lay strips of string cheese in a crisscross pattern. For ghosts, place a slice of provolone cut into a ghost shape in the center.
- Decorate with olives for eyes, pepperoni cut into jack-o’-lantern faces, bell pepper pieces for stems or mouths, mushrooms for monster ears or ghostly wisps, and other optional toppings as desired.
- Bake for 10-12 minutes (English muffins) or 8-10 minutes (thin tortillas), until cheese is bubbling and starting to brown.
- Transfer pizzas to a wire rack immediately after baking to keep bottoms crispy.
- Let mini pizzas cool for 2-3 minutes before serving.
Notes
Pat wet toppings dry before adding to prevent sogginess. Add detailed decorations halfway through baking for best results. Use gluten-free or dairy-free substitutions as needed. For extra crisp, broil pizzas for 1-2 minutes at the end. Let kids decorate their own for a fun activity.
- Prep Time: 20 minutes
- Cook Time: 12 minutes
- Category: Snack
- Cuisine: American
Nutrition
- Serving Size: 1 mini pizza
- Calories: 135
- Sugar: 2
- Sodium: 320
- Fat: 3
- Saturated Fat: 1.5
- Carbohydrates: 16
- Fiber: 2
- Protein: 6
Keywords: Halloween, mini pizzas, snack board, party food, kid-friendly, spooky, easy, festive, English muffin pizza, holiday recipe