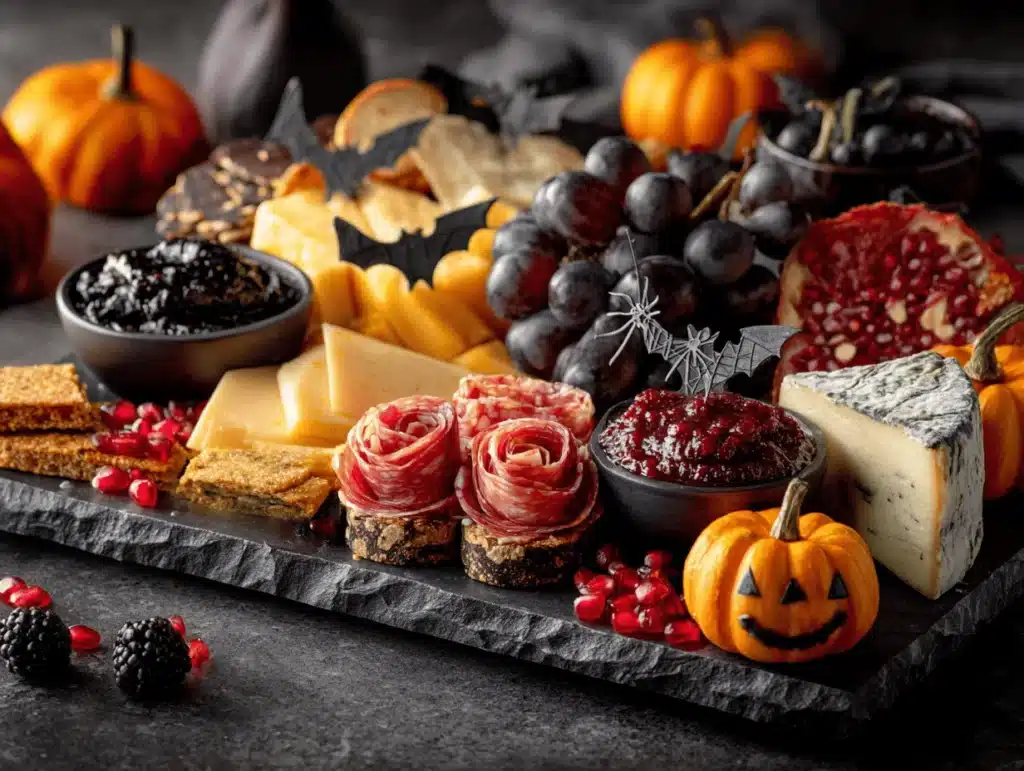
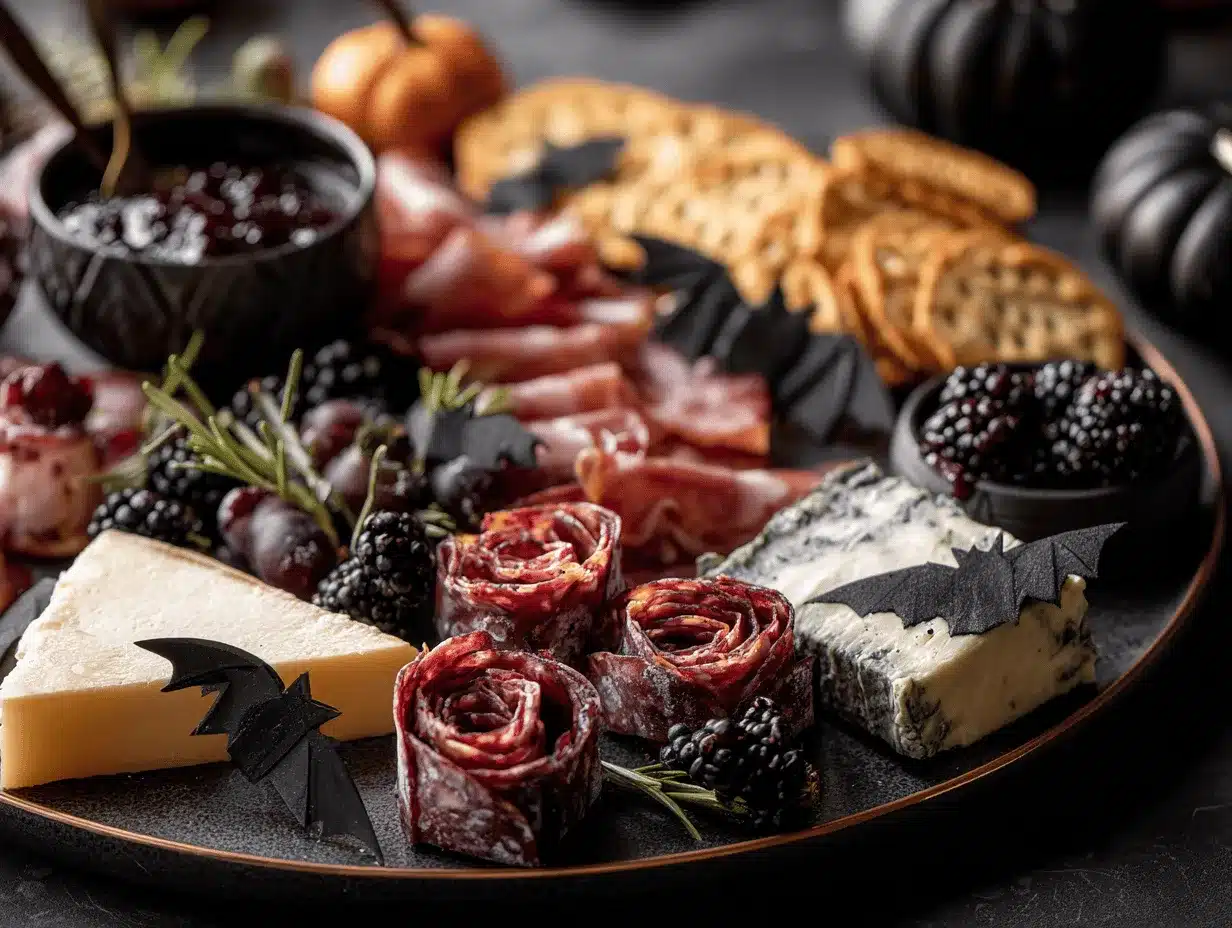
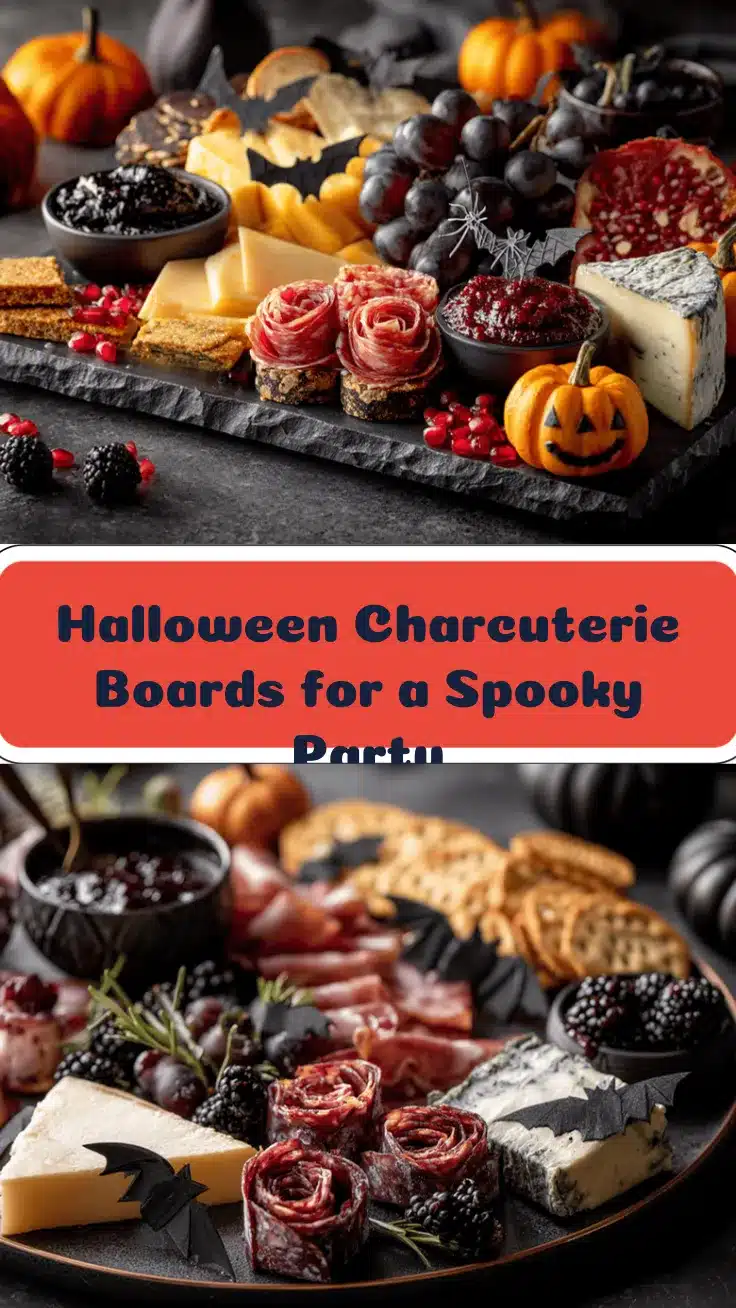
There’s just something magical (and a little mischievous) about Halloween parties, right? The moment you walk in and see a table stacked with treats that look both creepy and delicious—well, that’s when the party truly comes alive. The first time I made a Halloween charcuterie board, honestly, it was a bit of a chaotic mess. I was determined to make a snack spread that screamed “spooky” without resorting to a bunch of sugary candy. Turns out, arranging meats, cheeses, and little “monster” crackers into a themed board is pure joy—like edible arts and crafts for grown-ups!
Now, every October, I find myself dreaming up new Halloween charcuterie board ideas to wow my friends and family. Each board is a chance to play with color, texture, and flavor—plus, it’s always a crowd-pleaser. Whether you’re hosting a big bash or a cozy family night, a Halloween charcuterie board is the easiest way to bring festive vibes (and Instagram-worthy style) to your table. It’s also secretly practical: you can prep most ingredients in advance and let guests graze at their own pace.
Honestly, I’ve tested and tweaked this concept over the years—think cheese “ghosts,” olive “eyeballs,” and crackers shaped like bats. So if you’re craving Halloween charcuterie board ideas that hit the sweet spot between spooky and delicious, you’re in the right place. Let’s dig into how you can make your very own irresistible Halloween charcuterie boards for spooky parties. Whether you need ten easy spooky party platters or just one showstopper, you’ll find plenty of inspiration here (plus all my tips for making it stress-free and spectacular).
Why You’ll Love This Recipe
Let’s face it, Halloween snacks often end up being a sugar overload. That’s why these Halloween charcuterie board ideas have become my go-to for any spooky gathering. Here’s why you’ll find yourself returning to these boards again and again:
- Quick & Easy: You can assemble a board in under 30 minutes, perfect for last-minute party prep or when you just want to relax and enjoy the festivities.
- Simple Ingredients: Most elements are pantry staples or easy to grab at the store—no need for complicated specialty items.
- Perfect for Halloween Parties: These boards are guaranteed to be the centerpiece of your snack table, whether you’re hosting a big bash or a small family night.
- Crowd-Pleaser: Kids love the spooky shapes and colors, adults love the flavors (and the chance to sneak a little protein in between all those candy bars).
- Unbelievably Delicious: The mix of creamy cheeses, savory meats, sweet jams, and crunchy snacks creates a flavor explosion—plus, it looks amazing in photos!
What sets my Halloween charcuterie boards apart? I like to use unexpected elements—think “witches’ fingers” made from salami and almond slivers, or “monster mouths” built with apple slices and marshmallows. Every board is an edible conversation starter. I’ve learned over time that letting your creativity run wild is the key to a memorable platter. Swapping in seasonal veggies or themed crackers always gets a few laughs (and second helpings!).
These boards aren’t just snacks—they’re an experience. If you want to impress your guests without spending hours in the kitchen, this is your ticket. Plus, you can easily adapt the boards for allergies, dietary needs, or whatever’s in your fridge. That’s the magic of charcuterie—Halloween style!
Ingredients Needed
This recipe is all about flexibility and fun, but here’s a breakdown of my favorite ingredients for irresistible Halloween charcuterie boards. Feel free to mix and match based on what you love or have on hand—these are just my tried-and-true picks!
- Cheeses:
- Sharp cheddar, sliced (great for pumpkin shapes)
- Brie or camembert (ideal for “ghost” cutouts)
- Colby Jack, cubed or sliced (for pops of orange color)
- Fresh mozzarella balls (perfect for “eyeballs” with olive slices)
- Cream cheese (for spreading or making “monster” dips)
- Cured Meats:
- Salami, thinly sliced (can be shaped into “roses” or “witches’ fingers”)
- Prosciutto or ham (adds a nice salty bite)
- Pepperoni slices (classic, and easy to layer for “pumpkin faces”)
- Tiny cocktail sausages (for “mummy” wraps with crescent dough)
- Crackers & Bread:
- Pretzel sticks (for crunchy “bones”)
- Black sesame crackers (adds a dark, dramatic look)
- Mini rye toasts (good for spooky shapes)
- Pita chips (great for dipping and adding texture)
- Halloween-themed crackers (pumpkin, bat, or ghost shapes—check the seasonal aisle!)
- Fresh Produce:
- Green and red grapes (for “eyeballs” or clusters)
- Apple slices (for “monster mouths” with peanut butter and mini marshmallows)
- Carrot sticks (add color and crunch—slice into “witches’ broomsticks”)
- Olives, black and green (for “spooky eyes” or “spider bodies”)
- Dried apricots (looks like tiny pumpkins!)
- Sweet & Savory Extras:
- Fig jam or honey (for spreading on cheeses)
- Almonds or pecans (for “fingers” or extra crunch)
- Chocolate-covered pretzels (for a sweet-salty surprise)
- Mini marshmallows (for teeth or ghost decorations)
- Candy eyes (the easiest way to make anything look “monstrous”)
If you need gluten-free options, swap in gluten-free crackers or breadsticks—simple! For dairy-free boards, use nut-based cheeses or hummus. I personally prefer [Brand] for crackers because they’re sturdy and don’t get soggy, even after a couple hours on the board. For cheeses, look for blocks you can slice or shape—pre-sliced is fine, but it’s more fun to carve out your own “pumpkins” and “ghosts.”
Seasonal swaps are awesome too: in autumn, I love tossing in roasted pumpkin seeds or fresh figs. If you want a vegetarian board, just skip the cured meats and double up on veggie “creatures” and dips. Honestly, making it your own is half the fun!
Equipment Needed
You don’t need a fancy setup to make a killer Halloween charcuterie board, but here are the tools I always reach for:
- Large Cutting Board or Serving Platter: Wooden boards look rustic, but any big plate or tray will do. If you’re going for Pinterest vibes, slate or black trays really make the colors pop!
- Small Bowls or Ramekins: Perfect for dips, jams, olives, or candies. I use these to corral anything messy.
- Cheese Knives or Spreaders: Handy for slicing and spreading—kids love the little cheese forks, too.
- Cookie Cutters: Mini pumpkin, ghost, and bat shapes make cheese and crackers extra festive. I’ve found the metal ones work best for slicing through cheese.
- Toothpicks or Cocktail Sticks: Great for assembling “monster mouths” and holding together rolled meats.
- Optional: Small decorative items (plastic spiders, edible flowers) for extra Halloween flair.
If you don’t have a big board, use a rimmed baking sheet lined with parchment—it’s easy to clean and keeps everything in place. I’ve used everything from pizza pans to cutting boards, and it always works out. For bowls, thrift store finds or mismatched ramekins add charm. Keep cheese knives sharp and clean, and store cookie cutters in a dry place so they don’t rust.
Budget tip: Dollar stores often have seasonal serving trays and little bowls that look fabulous for Halloween!
Preparation Method
Ready to assemble your own Halloween charcuterie board? Here’s my step-by-step guide (with all my best hacks and some warnings from past party disasters—trust me, you want to read these!):
- Prep all ingredients: Wash and dry your produce. Slice cheeses into fun shapes using cookie cutters—pumpkins, ghosts, bats (about 1/4-inch thick, 0.6 cm). Slice meats into thin strips or roll into “witches’ fingers.” Cut apples and carrots as needed for “monster mouths” or broomsticks. Time: 15 minutes.
- Arrange bowls and ramekins: Place small bowls for dips, jams, or olives on your board first. This anchors your layout and prevents spills later. Tip: Put messy items (like fig jam) in the center to keep things tidy.
- Lay down a base layer: Start with your biggest items—cheese shapes, clusters of grapes, rows of crackers. Fan out the cheddar pumpkins, cluster ghost-shaped brie in one corner. Time: 5 minutes.
- Add meats and savory extras: Roll salami strips into “roses” or fingers, tuck in prosciutto beside cheese. Lay out pepperoni slices in a jack-o’-lantern pattern. Use toothpicks to make “monster mouths” with apple slices, peanut butter, and mini marshmallows. Time: 10 minutes.
- Fill gaps with produce: Add grapes, carrot sticks, olives, and dried apricots to fill out the board. Place black olives in pairs for “spider bodies”—stick in pretzel legs. Warning: Don’t overload the board or things will slide off!
- Sprinkle in sweet treats and nuts: Dot chocolate-covered pretzels, nuts, and candy eyes throughout the board. Put mini marshmallows near cheese for “ghost trails.” If you have themed candies, use them sparingly—too much color can look chaotic (been there, fixed that).
- Decorate for effect: Finish by adding edible flowers or plastic spiders for extra Halloween flair. Make sure anything not edible is clearly marked (once, someone ate a fake spider… oops!).
- Final touches: Double-check that every item is easy to reach and nothing is hidden under bigger items. Wipe any cheese smears and give the board a quick once-over for presentation.
If you’re prepping ahead, arrange everything except crackers and bread (they get soggy). Store sliced cheeses and meats in airtight containers in the fridge, covered with wax paper. Assemble the board 30 minutes before guests arrive for best results. Sensory tip: The board should smell savory and sweet, look bright and fun, and feel like a mini feast just waiting to be devoured!
Efficiency tip: Get your kids or friends involved—assembly is way more fun with helpers, and you’ll avoid last-minute stress.
Cooking Tips & Techniques
Creating a Halloween charcuterie board might look easy, but a few pro tips will make your spooky platter both gorgeous and practical. Here’s what I’ve learned after many parties (and at least a few “Pinterest fails”):
- Color and texture: Mix orange, black, green, and white elements for classic Halloween vibes. Alternate creamy cheeses with crunchy crackers and chewy dried fruit—it keeps every bite interesting.
- Layering: Don’t just lay everything flat. Stack cracker “towers,” lean cheese shapes against grapes, and nestle meats in little waves. This gives depth and makes the board look full (without buying double the ingredients).
- Shape play: Cookie cutters are your best friend for themed cheese and crackers. If you don’t have any, use a small knife and freehand simple shapes—imperfection adds charm!
- Spacing: Leave some negative space so each item stands out. Crowding can make a board look messy, especially with lots of dark colors.
- Avoid soggy snacks: Always add crackers and bread last. I made the mistake of assembling everything hours in advance—trust me, stale crackers are nobody’s favorite.
- Multitasking: Prep all ingredients before assembly. If you’re hosting, assign “board duty” to a friend while you finish other party tasks.
- Common mistakes: Overloading the board, not anchoring bowls, and forgetting utensils. I once had a board where everything slid off the tray—lesson learned, keep it balanced!
- Consistency: Use similar-size items to keep the look neat. Too many tiny bits get lost, so stick to a few different sizes for visual interest.
- Personal lesson: Don’t stress about perfection. Your guests will love whatever you create—trust me, they’re there for the snacks and the fun, not your knife skills!
With these tricks, you’ll nail your Halloween charcuterie board every time. It’s all about making it playful and approachable—spooky, but not stressful!
Variations & Adaptations
Halloween charcuterie boards are meant to be personalized, so don’t be afraid to switch things up! Here are my favorite ways to adapt your board for different tastes, diets, and seasons:
- Vegetarian: Swap out cured meats for roasted veggies, marinated artichokes, or extra cheeses. Try hummus for dipping and use “monster mouths” made with veggie sticks and black olives.
- Gluten-Free: Use gluten-free crackers, rice cakes, and seed-based crisps. Many stores now carry Halloween-themed gluten-free options—just check labels for hidden wheat.
- Low-Carb/Keto: Load up on cheeses, nuts, olives, and cured meats. Skip sweet jams and use guacamole or ranch as dips. I’ve made keto boards with cucumber slices and pepperoni “pumpkin faces”—they’re always a hit!
- Seasonal Flavors: Add roasted pumpkin seeds, dried cranberries, or fresh figs in autumn. For a more classic Halloween flavor, toss in cinnamon-spiced nuts or apple butter.
- Flavor Customization: If you love spicy, add pepper jack cheese, hot salami, or jalapeño-stuffed olives. For a sweeter board, mix in chocolate chips, caramel dip, or candied pecans.
- Cooking Methods: For a warm option, serve baked brie “ghosts” or crescent-wrapped cocktail sausages (“mummies”). Just be sure to keep hot items separate from cold snacks to avoid sogginess.
One personal favorite? I once made a vegan board with cashew cheese, roasted chickpeas, and veggie “bats”—even the meat-lovers went back for seconds. Don’t be shy about mixing and matching. Your board, your rules!
Serving & Storage Suggestions
The best part of a Halloween charcuterie board is that it’s both a feast and a centerpiece. Here’s how I like to serve and store mine:
- Serving temperature: Serve the board at cool room temperature—cheeses are best slightly softened, meats are more flavorful, and fruits stay perky. If you have hot elements, keep them on a separate tray.
- Presentation: Place your board on a table with Halloween props—think fake cobwebs, pumpkins, or little LED candles. Serve with small plates, napkins, and cheese knives for easy grazing.
- Complementary dishes: Pair with apple cider, mulled wine, or a pumpkin punch. For a full spread, add soup shooters or veggie dips.
- Storage: If you have leftovers, pack cheeses and meats in airtight containers in the fridge (up to 3 days). Crackers should be stored separately to avoid softening.
- Reheating tips: For warm elements like baked brie or “mummy” sausages, reheat gently in the oven (300°F/150°C) until just warm. Cold items are best enjoyed as-is.
- Flavor development: Some cheeses and meats taste even better the next day after the flavors meld—just be sure to wrap everything tightly to prevent drying out.
I’ve found that the board looks and tastes best when assembled right before serving. If you do prep ahead, keep wet ingredients apart and add crunchy items last. Trust me, a little planning goes a long way!
Nutritional Information & Benefits
Halloween charcuterie boards can be as healthy (or indulgent) as you want. Here’s an estimate for a typical board serving (about 1/8 of a large platter):
- Calories: 250-350
- Protein: 8-14g
- Carbohydrates: 18-30g
- Fat: 15-22g
- Fiber: 2-5g
- Sodium: 350-600mg
Cheeses provide calcium and protein, while nuts add healthy fats. Grapes and apples bring in vitamins and fiber. You can easily adjust for dietary needs—use gluten-free crackers, vegan cheeses, or low-sugar dips. Allergens to watch for: dairy, nuts, and wheat. Always label your board if serving to guests with allergies.
Personally, I love that you can sneak in veggies and fruit among the treats—makes me feel a little less guilty about all the candy later!
Conclusion
Halloween charcuterie boards aren’t just food—they’re a festive experience that brings people together. Whether you’re crafting ten easy spooky party platters or one showstopper for your family, this recipe is packed with fun, flavor, and flexibility. You’ll love how simple it is to adapt every board to your guests’ tastes and dietary needs.
Honestly, it’s become my favorite way to kick off spooky season. Every board is a canvas—so get creative, swap in your favorite snacks, and don’t stress about perfection. Your guests will remember the fun and flavor long after the party is over.
Ready to try these Halloween charcuterie board ideas? Share your creations or questions in the comments below! I’d love to see your spooky platters—and hear about your own twists and tricks. Happy haunting and happy snacking!
FAQs
How far in advance can I assemble a Halloween charcuterie board?
It’s best to prep ingredients ahead, but assemble the board no more than 30-60 minutes before serving to keep crackers fresh and cheese at the perfect texture.
Can I make a Halloween charcuterie board for a large crowd?
Absolutely! Just use a larger tray or several boards. Double up on popular items like cheese, meats, and crackers, and add extra bowls for dips and treats.
What if I don’t have themed cookie cutters?
No problem—you can freehand shapes with a small knife, use store-bought Halloween crackers, or simply focus on color and arrangement for festive vibes.
How do I keep fruits from browning on the board?
Toss apple slices or other fruit with a little lemon juice before adding them to the board. This helps prevent browning and keeps everything looking fresh.
Can I make a vegan Halloween charcuterie board?
Definitely! Use vegan cheeses, hummus, roasted veggies, and plenty of fresh fruit. There are even plant-based deli slices if you want to mimic traditional charcuterie!
Pin This Recipe!
Halloween Charcuterie Board Ideas: 10 Easy Spooky Party Platters
- Total Time: 15 minutes
- Yield: 8 servings
Description
Create a festive and spooky Halloween charcuterie board packed with cheeses, meats, crackers, fruits, and themed treats. This easy party platter is customizable for any crowd and dietary need, making it the perfect centerpiece for your Halloween celebration.
Ingredients
- Sharp cheddar cheese, sliced
- Brie or camembert cheese
- Colby Jack cheese, cubed or sliced
- Fresh mozzarella balls
- Cream cheese
- Salami, thinly sliced
- Prosciutto or ham
- Pepperoni slices
- Tiny cocktail sausages
- Pretzel sticks
- Black sesame crackers
- Mini rye toasts
- Pita chips
- Halloween-themed crackers (pumpkin, bat, or ghost shapes)
- Green and red grapes
- Apple slices
- Carrot sticks
- Olives, black and green
- Dried apricots
- Fig jam or honey
- Almonds or pecans
- Chocolate-covered pretzels
- Mini marshmallows
- Candy eyes
Instructions
- Wash and dry all produce. Slice cheeses into Halloween shapes using cookie cutters (pumpkins, ghosts, bats). Slice meats into thin strips or roll into themed shapes. Cut apples and carrots for monster mouths or broomsticks.
- Place small bowls or ramekins for dips, jams, or olives on the board first to anchor your layout.
- Lay down a base layer with the largest items: cheese shapes, clusters of grapes, and rows of crackers.
- Add meats and savory extras: roll salami into roses or fingers, tuck in prosciutto, and arrange pepperoni slices in festive patterns. Use toothpicks to assemble monster mouths with apple slices, peanut butter, and mini marshmallows.
- Fill gaps with produce: grapes, carrot sticks, olives, and dried apricots. Pair black olives for spider bodies and use pretzel sticks for legs.
- Sprinkle sweet treats and nuts throughout the board: chocolate-covered pretzels, nuts, candy eyes, and mini marshmallows.
- Decorate with edible flowers or plastic spiders for extra Halloween flair. Clearly mark any non-edible items.
- Double-check that all items are easy to reach and nothing is hidden. Wipe any cheese smears and finalize presentation.
- If prepping ahead, store sliced cheeses and meats in airtight containers in the fridge. Assemble the board 30 minutes before serving, adding crackers and bread last.
Notes
For best results, assemble the board just before serving to keep crackers fresh. Use lemon juice on apple slices to prevent browning. Adapt for dietary needs by using gluten-free crackers or vegan cheeses. Get creative with shapes and colors for a festive look. Avoid overcrowding the board to prevent items from sliding off.
- Prep Time: 15 minutes
- Cook Time: 0 minutes
- Category: Appetizer
- Cuisine: American
Nutrition
- Serving Size: About 1/8 of a large platter
- Calories: 250350
- Sugar: 8
- Sodium: 350600
- Fat: 1522
- Saturated Fat: 8
- Carbohydrates: 1830
- Fiber: 25
- Protein: 814
Keywords: Halloween, charcuterie board, party platter, spooky snacks, cheese board, appetizer, festive, easy, entertaining, holiday