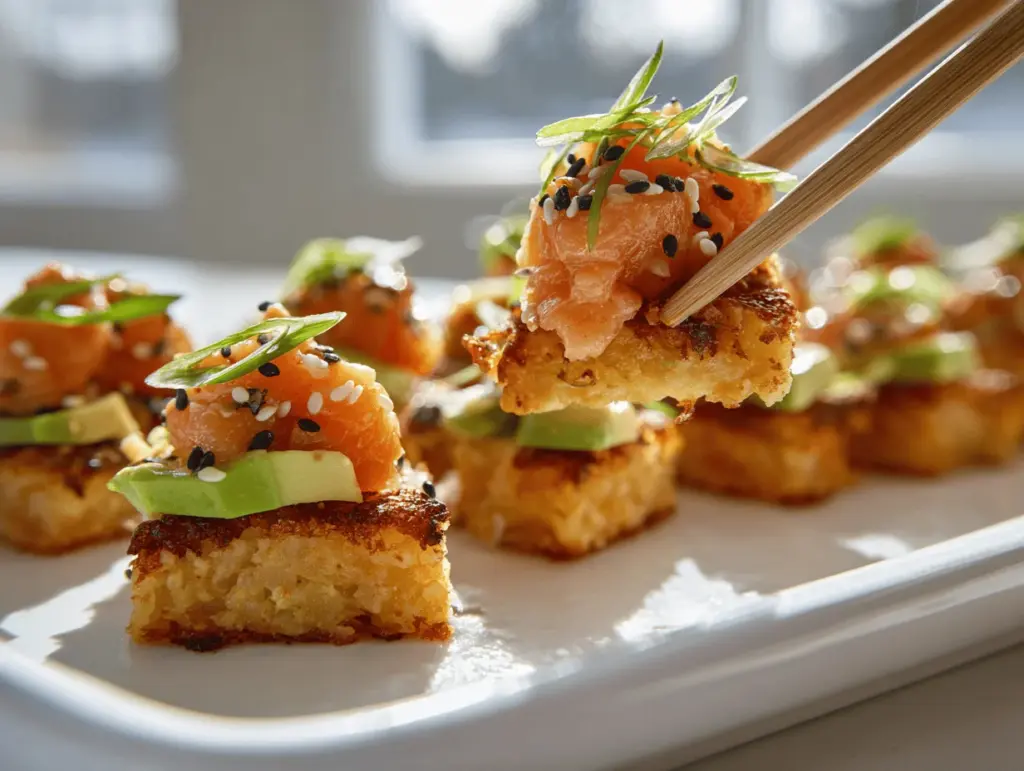
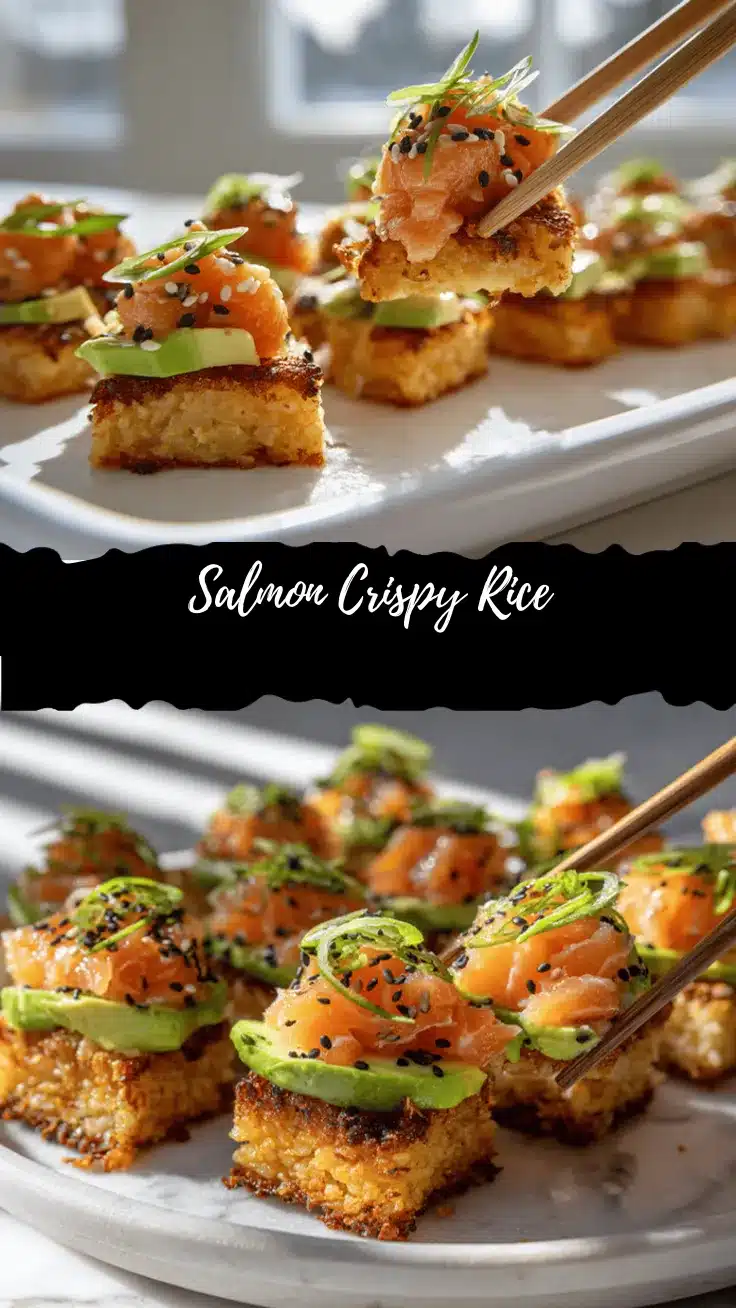
The first time I pressed sticky sushi rice into little rounds and fried them until golden, my whole kitchen smelled like a fancy sushi restaurant. I’ll never forget the crunch when I bit into a salmon crispy rice cake—crispy edges, tender rice inside, and that creamy, spicy salmon topping. Suddenly, my weeknight dinner felt like something special, even if I was in sweats and binge-watching reality TV. If you love sushi but want to skip the rolling (and the price tag), these easy salmon crispy rice cakes are about to become your new obsession.
Honestly, I came up with this recipe after a sushi night disaster—my rolls fell apart, but the flavors were too good to waste. So, I mashed everything together, pan-fried the rice, and topped it with spicy salmon. Now it’s a family favorite, and my friends beg for these whenever they visit. They look impressive but are way less fussy than making sushi rolls. Plus, they’re perfect for dinner, parties, or even lunch meal-prep (if you manage not to eat them all right away!).
Salmon crispy rice is a genius way to transform leftover cooked rice and pantry staples into something that tastes restaurant-worthy. It’s high in protein, totally customizable, and surprisingly easy to make. Whether you’re feeding picky kids, spicing up a date night in, or just treating yourself, these sushi rice cakes bring all the fun and flavor—no takeout required. I’ve made this recipe at least a dozen times, tweaking the sauce and toppings, and I can honestly say it’s tried, tested, and absolutely crave-worthy.
Why You’ll Love This Salmon Crispy Rice Recipe
- Quick & Easy: Ready in under 40 minutes, even with chill time. No sushi-rolling skills or special gadgets needed.
- Simple Ingredients: Uses pantry staples and fresh salmon—no hunting down fancy stuff at specialty markets.
- Perfect for Dinner (or Parties!): These sushi rice cakes are bite-sized, fun, and way more exciting than takeout when you want to impress guests or just make Tuesday feel special.
- Crowd-Pleaser: Kids love the crispy rice, adults love the spicy salmon. It’s a win-win every time I serve it.
- Unbelievably Delicious: Think crunchy-bottomed rice, creamy spicy salmon, and a hint of umami in every bite. It’s comfort food with a playful sushi twist.
I’ve tested so many versions of these salmon crispy rice cakes—baked, air-fried, topped with everything from spicy mayo to eel sauce. What makes this version stand out? Blending a bit of rice vinegar and sugar into the rice for that classic sushi flavor, then pan-frying until the edges are gloriously crisp. The salmon topping? A creamy, spicy mix that’s just rich enough without being heavy. It’s the kind of dish that makes you do a happy dance in your kitchen.
Let’s face it: sushi night at home can feel intimidating, but this recipe makes it attainable for anyone. You get all the flavors and textures of your favorite spicy salmon roll, but with a crispy, satisfying base. Whether you’re cooking for yourself or a crowd, these are the bites you’ll crave again and again. Trust me, after the first try, you’ll be hooked.
What Ingredients You Will Need
This recipe uses fresh, wholesome ingredients to deliver big flavor and that iconic sushi texture—without the fuss. Most of these are easy to find at your regular grocery store, and I’ll share my favorite substitutions too!
- For the Sushi Rice Cakes:
- Sushi rice or short-grain rice (1 1/2 cups uncooked, about 300g) – sticky and perfect for shaping
- Rice vinegar (3 tbsp / 45ml) – gives that classic sushi tang
- Sugar (1 tbsp / 12g) – balances the vinegar
- Salt (1/2 tsp / 3g) – brings out flavor
- Neutral oil for frying (e.g., avocado oil or canola, about 1/4 cup / 60ml) – for that crisp golden crust
- For the Spicy Salmon Topping:
- Fresh salmon (6 oz / 170g), skinless, sushi-grade preferred if eating raw, or use cooked/leftover salmon
- Kewpie mayonnaise (2 tbsp / 30g) – rich and creamy (regular mayo works, but Kewpie is best!)
- Sriracha or chili sauce (1-2 tsp / 5-10ml) – adjust to your heat preference
- Soy sauce (1 tsp / 5ml) – for umami depth
- Green onion (1, finely chopped) – adds freshness and a pop of color
- Lime juice (1 tsp / 5ml, optional) – a bright, zesty kick
- Toasted sesame oil (1/2 tsp / 2ml, optional) – for nutty aroma
- For Garnishing:
- Avocado slices – creamy and cooling
- Sesame seeds – adds crunch and visual flair
- Nori strips (seaweed) – for a true sushi vibe
- Pickled ginger (optional) – a tangy, refreshing bite
- Thinly sliced jalapeño or red chili (for extra heat)
Ingredient Tips: For best results, use sushi-grade salmon if you plan to serve it raw. If that’s not available, cooked or leftover salmon works perfectly (just flake it with a fork). I love Lundberg or Nishiki brand rice for consistent stickiness. Can’t find Kewpie mayo? Add a tiny splash of rice vinegar to regular mayo for a similar effect. Gluten-free? Use tamari in place of soy sauce. And if you want to skip the heat, simply leave out the sriracha—these are super flexible!
Equipment Needed
- Small saucepan or rice cooker: For cooking the sushi rice. I use my old trusty rice cooker (it never fails!), but a saucepan works too.
- Baking sheet or large plate: For cooling and shaping the rice cakes.
- Plastic wrap or parchment paper: Prevents sticking when pressing rice into shapes.
- Nonstick skillet or frying pan: Essential for frying—nonstick makes cleanup a breeze.
- Mixing bowls: For making the spicy salmon mixture and seasoning the rice.
- Sharp knife: For chopping salmon and garnishes. A sushi knife is great, but any sharp chef’s knife works.
- Measuring cups and spoons: Accuracy helps with the sushi rice seasoning.
- Optional: Cookie cutter or biscuit ring: If you want perfectly round rice cakes, but I usually just use my hands (rustic is good!).
Equipment Notes: If you don’t have a rice cooker, just follow the stovetop instructions—works just fine. My nonstick skillet has been a lifesaver for easy flipping and less oil. For perfectly shaped cakes, a damp cookie cutter works, but honestly, hand-shaped patties have more charm. If you’re short on mixing bowls, just give the bowl a quick rinse between steps. And keep a small bowl of water nearby for wetting your hands—sticky rice doesn’t play nice otherwise!
How to Make Salmon Crispy Rice (Step-by-Step Method)

- Cook the Sushi Rice:
- Rinse 1 1/2 cups (300g) sushi or short-grain rice under cold water until water runs clear.
- Add rice to a rice cooker with 2 cups (480ml) water, or to a small saucepan. Bring to a boil, then reduce to low, cover, and cook for 18 minutes. Let rest off heat, covered, for 10 minutes.
- Tip: Rice should be sticky but not mushy—if it seems dry, add a tablespoon more water next time.
- Season the Rice:
- In a small bowl, mix 3 tbsp (45ml) rice vinegar, 1 tbsp (12g) sugar, and 1/2 tsp (3g) salt until dissolved.
- Transfer warm rice to a large bowl or baking sheet. Gently fold in vinegar mixture with a spatula, fanning the rice to cool it down. (This step gives the classic sushi rice flavor!)
- Let the rice cool to room temperature—about 15 minutes.
- Shape the Rice Cakes:
- With damp hands, scoop about 2 heaping tablespoons of rice and form into small rectangles or rounds, about 1/2 inch (1.25cm) thick. You’ll get about 12 cakes.
- Arrange on a parchment-lined plate or tray, cover loosely, and chill for 15–20 minutes. (Chilling helps them hold together when frying.)
- Prepare the Spicy Salmon Topping:
- Finely chop 6 oz (170g) salmon (if raw and sushi-grade) or flake cooked salmon with a fork.
- In a bowl, mix salmon with 2 tbsp (30g) Kewpie mayo, 1–2 tsp (5–10ml) sriracha, 1 tsp (5ml) soy sauce, 1 finely chopped green onion, and 1 tsp (5ml) lime juice (if using). Add 1/2 tsp (2ml) sesame oil for extra flavor, if desired.
- Mix until creamy and evenly coated. Taste and adjust seasoning—add more sriracha for heat or a pinch of salt if you like.
- Fry the Rice Cakes:
- Heat 1/4 cup (60ml) neutral oil in a nonstick skillet over medium-high heat.
- When oil shimmers, add rice cakes in a single layer (don’t crowd the pan). Fry 2–3 minutes per side, until deeply golden and crispy. Flip carefully—use a thin spatula and go slow.
- Drain on a paper-towel-lined plate. Repeat with remaining cakes, adding a bit more oil if needed.
- Warning: Hot oil splatters! Keep kids and pets away from the stove during this step.
- Assemble and Garnish:
- Top each crispy rice cake with a spoonful of spicy salmon. Add avocado slices, sprinkle with sesame seeds, and garnish with nori strips, pickled ginger, and jalapeño slices if desired.
- Serve immediately, while still warm and crunchy!
Personal Tips: If your rice cakes start to crack, just press them gently back together—don’t stress, they’ll still crisp up fine. If you want extra crunch, fry in two batches and don’t rush the flip. I sometimes double the salmon topping and save half for lunch the next day (hello, spicy salmon salad!).
Cooking Tips & Techniques
Here’s what I’ve learned after more than a few crispy rice experiments (and, let’s be real, more than a few kitchen fails):
- Don’t Skip the Chill: Chilling the rice cakes in the fridge helps them hold together—if you fry while warm, they might fall apart. I learned this the hard way (rice everywhere!).
- Wet Your Hands: Rice sticks to everything but wet hands. Keep a small bowl of water nearby and dip your fingers as you shape each cake.
- Use Enough Oil, but Not Too Much: You want enough oil to get a crispy crust, but not so much that the cakes get greasy. I use about 1/4 cup (60ml) for a standard skillet.
- Flip Carefully: Use a thin spatula to gently lift and flip each rice cake. If you try to move them too early, they’ll stick—wait until the bottom is golden and releases easily.
- Keep the Heat Medium-High: Too low, and the rice gets chewy, not crispy. Too high, and they’ll burn before the center heats up.
- Multitask Like a Pro: While the rice chills, make your spicy salmon topping and prep garnishes. It saves so much time.
Common mistake? Using old, dry rice—it just won’t stick together and gets tough. Always use freshly cooked or leftover rice that’s still a little sticky. And don’t overcrowd the pan; give each rice cake space, so they crisp up properly. Consistency is all about patience and prep—once you get the timing down, it’s smooth sailing (and seriously good eats!).
Variations & Adaptations
One of the things I love most about salmon crispy rice is how customizable it is. Here are my go-to tweaks:
- Different Proteins: Swap salmon for cooked shrimp, canned tuna (hello, spicy tuna crispy rice!), or even tofu for a vegetarian option. Just chop or mash your protein of choice and mix with the spicy mayo base.
- Gluten-Free: Use tamari instead of soy sauce, and double-check your sriracha and mayo if you’re sensitive. I’ve served this to gluten-free friends with rave reviews.
- Low-Carb: Swap sushi rice for riced cauliflower (steam, season, and press into cakes)—they won’t be quite as sticky but still get a nice crust.
- Spice Levels: Use less chili sauce for a mild version, or add a dash of wasabi for a sinus-clearing kick. My kids love it with just a hint of heat.
- Oven-Baked or Air Fryer Method: For a lighter version, brush rice cakes with oil and bake at 425°F (220°C) for 12-15 minutes, flipping halfway. Or air fry at 400°F (200°C) for 8-10 minutes.
- Seasonal Toppings: In summer, add diced cucumber or mango salsa for freshness. In winter, try a drizzle of eel sauce or teriyaki.
Personally, I love making a “deconstructed sushi bowl” version: top a warm crispy rice cake with all the fixings, then break it up and mix everything together—messy, but so satisfying!
Serving & Storage Suggestions
Serving: Salmon crispy rice is best enjoyed warm, right after frying—the rice is perfectly crunchy, and the salmon topping is creamy and cool. Arrange on a platter and sprinkle with sesame seeds and nori strips for maximum sushi vibes. I like to serve these with a side of edamame, miso soup, or a simple cucumber salad. For drinks, green tea or a crisp white wine pairs wonderfully.
Storage: If you have leftovers (rare in my house!), store rice cakes and salmon topping separately in airtight containers. The rice cakes keep in the fridge for up to 2 days—reheat in a skillet over medium heat or pop in the toaster oven for a few minutes to restore crispiness. The salmon topping is good for 1 day (if using raw fish, eat within 24 hours). I don’t recommend freezing, as the texture of the rice can get mushy. Flavors deepen overnight, but nothing beats that fresh crunch!
Nutritional Information & Benefits
Each serving (2-3 cakes with topping) is approximately 280 calories, with 13g protein, 9g fat, and 33g carbs. Salmon is loaded with omega-3 fatty acids and high-quality protein, making this recipe both satisfying and good for your heart and brain. Sushi rice provides quick energy, while avocado adds fiber and healthy fats. You can make this recipe gluten-free by swapping soy sauce for tamari, and dairy-free by using a plant-based mayo. Allergens to note: contains fish, egg (in mayo), and soy (in sauce). As someone who tries to eat balanced meals, I love knowing I’m getting a protein punch and a dose of good fats in every bite.
Conclusion
If you’re craving sushi at home but want something fun, easy, and totally crowd-pleasing, salmon crispy rice is the answer. You get all the flavors and textures of your favorite sushi rolls, minus the hassle. I’m always amazed at how excited friends and family get when these sushi rice cakes hit the table. Honestly, they make any night feel special—even if it’s just you, your favorite show, and a plate of crispy, spicy goodness.
Don’t be afraid to make this recipe your own! Switch up the toppings, play with the sauces, or even try a veggie version. Cooking should be about fun and flavor, not perfection. If you try these salmon crispy rice cakes, let me know in the comments—what’s your favorite twist? Share with a friend who loves sushi, and don’t forget to pin this for dinner inspo!
Here’s to cozy nights, crispy bites, and a little sushi magic right at home!
Frequently Asked Questions
Can I use leftover cooked rice for salmon crispy rice?
Yes, you can! Just be sure it’s short-grain or sushi rice, and bring it to room temperature before shaping. If it’s too dry, sprinkle with a little water and microwave for 30 seconds to soften.
Is it safe to use raw salmon for the topping?
If you use sushi-grade salmon from a reputable source, it’s safe to eat raw. Otherwise, use cooked or canned salmon for peace of mind—still delicious!
Can I make salmon crispy rice ahead of time?
You can shape and chill the rice cakes a few hours in advance, and make the salmon topping right before serving. For the best crunch, fry the rice cakes just before eating.
What’s the best way to reheat crispy rice cakes?
Reheat in a dry nonstick skillet over medium heat until hot and crispy again (about 2-3 minutes per side), or pop in a toaster oven. Avoid microwaving, as they’ll lose their crunch.
Can I make this recipe gluten-free?
Absolutely! Just swap the soy sauce for tamari or coconut aminos, and double-check your other sauces. It’s easy to adapt for gluten sensitivities.
Pin This Recipe!

Salmon Crispy Rice – Easy Sushi Rice Cakes for Dinner Fun
- Total Time: 38 minutes
- Yield: 12 rice cakes (serves 4 as appetizer or 2 as main) 1x
Description
These salmon crispy rice cakes feature golden, pan-fried sushi rice topped with a creamy, spicy salmon mixture and fresh garnishes. They deliver all the flavors and textures of your favorite sushi roll in a fun, easy-to-make appetizer or main dish.
Ingredients
- 1 1/2 cups sushi rice or short-grain rice (about 300g)
- 2 cups water (for cooking rice)
- 3 tablespoons rice vinegar
- 1 tablespoon sugar
- 1/2 teaspoon salt
- 1/4 cup neutral oil for frying (e.g., avocado oil or canola)
- 6 ounces fresh salmon, skinless (sushi-grade preferred, or use cooked/leftover salmon)
- 2 tablespoons Kewpie mayonnaise (or regular mayo)
- 1–2 teaspoons sriracha or chili sauce (to taste)
- 1 teaspoon soy sauce
- 1 green onion, finely chopped
- 1 teaspoon lime juice (optional)
- 1/2 teaspoon toasted sesame oil (optional)
- Avocado slices (for garnish)
- Sesame seeds (for garnish)
- Nori strips (seaweed, for garnish)
- Pickled ginger (optional, for garnish)
- Thinly sliced jalapeño or red chili (optional, for garnish)
Instructions
- Rinse 1 1/2 cups sushi or short-grain rice under cold water until the water runs clear.
- Add rice and 2 cups water to a rice cooker or small saucepan. Bring to a boil, reduce to low, cover, and cook for 18 minutes. Let rest off heat, covered, for 10 minutes.
- In a small bowl, mix 3 tablespoons rice vinegar, 1 tablespoon sugar, and 1/2 teaspoon salt until dissolved.
- Transfer warm rice to a large bowl or baking sheet. Gently fold in the vinegar mixture with a spatula, fanning the rice to cool. Let the rice cool to room temperature (about 15 minutes).
- With damp hands, scoop about 2 heaping tablespoons of rice and form into small rectangles or rounds, about 1/2 inch thick. You should get about 12 cakes.
- Arrange rice cakes on a parchment-lined plate or tray, cover loosely, and chill for 15–20 minutes.
- Finely chop 6 ounces salmon (if raw and sushi-grade) or flake cooked salmon with a fork.
- In a bowl, mix salmon with 2 tablespoons Kewpie mayo, 1–2 teaspoons sriracha, 1 teaspoon soy sauce, 1 finely chopped green onion, 1 teaspoon lime juice (if using), and 1/2 teaspoon sesame oil (if using). Mix until creamy and evenly coated. Taste and adjust seasoning.
- Heat 1/4 cup neutral oil in a nonstick skillet over medium-high heat.
- When oil shimmers, add rice cakes in a single layer (don’t crowd the pan). Fry 2–3 minutes per side, until deeply golden and crispy. Flip carefully. Drain on a paper-towel-lined plate. Repeat with remaining cakes, adding more oil if needed.
- Top each crispy rice cake with a spoonful of spicy salmon. Add avocado slices, sprinkle with sesame seeds, and garnish with nori strips, pickled ginger, and jalapeño slices if desired.
- Serve immediately while still warm and crunchy.
Notes
For best results, use sushi-grade salmon if serving raw; otherwise, cooked or leftover salmon works well. Chill rice cakes before frying to help them hold together. Wet your hands when shaping rice to prevent sticking. For a gluten-free version, use tamari instead of soy sauce. Rice cakes are best served fresh but can be reheated in a skillet or toaster oven. Customize toppings as desired.
- Prep Time: 20 minutes
- Cook Time: 18 minutes
- Category: Appetizer
- Cuisine: Japanese
Nutrition
- Serving Size: 2-3 rice cakes with topping
- Calories: 280
- Sugar: 3
- Sodium: 400
- Fat: 9
- Saturated Fat: 1.5
- Carbohydrates: 33
- Fiber: 2
- Protein: 13
Keywords: salmon crispy rice, sushi rice cakes, spicy salmon, easy sushi, Japanese appetizer, pan-fried rice, party food, gluten-free option, meal prep, sushi at home